6 Blood physiology
The internal environment of the body is represented by a tissue (interstitial) fluid, lymph and blood, the composition and properties of which are closely related. However, the true internal environment of the body is the tissue fluid, since only this fluid comes into contact with the cells of the body. The blood contacts directly with the endocardium and the endothelium of the vessels and ensures their vital activity, and only indirectly through the tissue fluid it interferes with the work of all organs and tissues without exception. Through the vascular wall, hormones and various biologically active compounds are transported into the bloodstream.
The role of blood in the body is very diverse. It transports gases and nutrients, removes metabolic products, and plays thermoregulatory, correlative, protective roles in the body.
6.1 Determination of the red blood cell count in human blood
The main function of the red blood cells: the transfer of oxygen is done by the hemoglobin in the red blood cells. During the evolution of animals, with the increasing need for oxygen, the shape, size and structure of the red blood cells changed. In frogs, the red blood cells are large, in the form of ellipsoids and contain a nucleus. Human red blood cells have the form of biconcave disks, the nucleus is absent; its place is occupied by hemoglobin.
Work 1. Examination of colored frog and human blood products under a microscope
The purpose of the lesson: Comparison of red blood cells of a frog and a human and examination of human white blood cells.
The following is necessary for work: Microscope, colored human and frog blood
Work progress: Look at the human and frog blood smears with a microscope zoomed in. Pay attention to the shape, size, presence or absence of the nucleus in the red blood cells. Sketch the red blood cells of the human and frogs. In the blood smear of a human, notice various forms of white blood cells: neutrophils, eosinophils, basophils, monocytes and lymphocytes - and sketch them.
Work 2. Determination of the red blood cell count in human blood
Blood cells include white blood cells, red blood cells, and platelets. The number of shaped elements in the blood is usually expressed by their amount in 1 mm3 of blood. The count of the shaped elements is performed in counting chambers under a microscope. There are several chambers (Tom-Zeis Goryaev). Goryaev's counting chamber is a thick slide glass, divided into 3 plates by grooves, the middle of which is 1/10 mm lower than the two at the edges (Figure 4.6). If a cover glass is placed on the extreme plates, a gap of 0.1 ml is formed between the cover glass and the middle plate; this is the camera. The middle plate is divided into two halves by a groove, and a grid is placed on each of them. The Goryaev grid (Figure 5) consists of 225 large squares arranged in 15 rows of 15 cells in each row (look at low magnification).
Every third large square is divided into 16 small ones. The side of the small square is 1/20 mm. Therefore, its area is 1/400 mm2 (1-20 x 1-20 = 1-400). The height of the chamber is 1/10 mm. Hence the volume of the camera above the small square is 1/4000 mm3.
In 1 mm3 of blood, the count of red blood cells in men (usually): 4 500 000-5 000 000, in women: 4 000 000-4 500 000.
The purpose of the lesson: determine the red blooed cells count in the subject, compare the obtained data with the norm
The following is necessary for work: microscope, Goryaev's counting chamber with a cover glass, erythrocytic mixer, disposable needle, watch glass, 2-3% sodium chloride solution, cotton wool, alcohol, ether.
Work progress: Examine the counting chamber under a microscope with large and small magnification. A 2-3% solution of table salt is poured into the watch glass. The subject's finger of the left hand is disinfected and pierced to a depth of 2-3 mm with a disinfected disposable needle. Observing the rules of taking blood, take the blood in the blood-count pipet to a mark of 0.5, while ensuring that the blood column is not interrcepted by air bubbles. The tip of the blood-count pipet is wiped with a dry tampon, immersed in a watch glass with a solution of sodium chloride and, the solution is sucked into the blood-count pipet to the mark 101. Then the mixer is moved from the vertical position to the horizontal one, and the blood mixture is carefully mixed for 1-2 minutes, while the ends of the blood-count pipet are covered with fingers.
Filling the chamber: lightly pressing on the rubber tube, remove 2 drops from the blood-count pipet on a cotton tampon. Put a cover glass on the side of the counting chamber and densely rub it until the appearance of Newtonian rings. Bring the tip of the capillary of the blood-count pipet to the edge of the cover glass and gently release a drop of diluted blood. First, at the small increase, the upper left large square is sought, and by moving the grid from left to right, the number of blood corpuscles in each of the four small squares in the upper row of the large square is counted. Then the red blood cells in the four squares of the second row are counted, and so on. To avoid the recounting of the same blood corpuscles, all the red blood cells lying inside each square and located on the upper and left sides of the square are counted. Red blood cells lying on the right and lower border lines are not counted (Figure 6, 1).
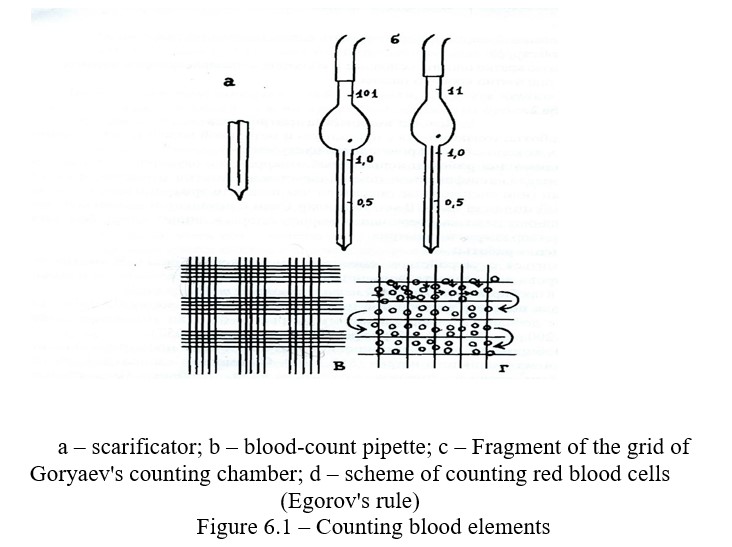
When all the red blood cells in the left large square are counted, move the grid diagonally and the red blood cells in the next large squares are counted in the exactly the same. The calculation of the number of red blood cells in 1 mm3 is performed as follows: determine the number of red blood cells in one small square. To do this, the counted red blood cells (A) in 5 large squares are divided into 80 small squares, because in each large square there are 16 small ones (5x16-80). The liquid volume above 1 small square is 1/4000 mm3. Therefore, the number of red blood cells in 1 mm3 of blood

The resulting number of red blood cells is multiplied by dilution, i.e. by 200 or 100. The formula for calculating the number of red blood cells is as follows:
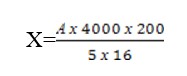
А – the number of red blood cells in five large squares.
4000 – a number that shows how many times the volume of 1 mm3 exceeds the volume of a small square.
200 – dilution,
5х16 – the number of small squares in which red blood cells are counted. Based on the calculation done, calculate the number of red blood cells in 1 mm3.
Control questions
- What form elements does blood contain?
- Structure of red blood cells and their functions?
- The red blood cells count and their count in different animals?
- The influence of external factors on the red blood cells count?
- Effect of pregnancy on the red blood cells count?
- Chemical composition of red blood cells?
- Erythrocytosis and its types?
- What is used for diluting red blood cells during counting?
6.2 Estimation of white blood cells in human blood
When counting white blood cells, the blood is diluted with the Tutk liquid 10-20 times. Acetic acid, which is a part of the Turk liquid, hemolyzes red blood cells, and methylene blue stains the nuclei of white blood cells. Mixers for white blood (blood-count pipette) are a capillary tube with ampoule-like expansion, in which there is a white ball for better mixing of blood. The mixer has 3 marks 0.5, I and II. The labels 0.5 and I are located on the capillary, and the label II behind the ampoule-like expansion. The capacity of an ampoule-like expansion is 10 times that of a capillary. Therefore, by taking the blood into capillary to the mark I and then the solution, the Turk liquid to the mark II, the blood is diluted 10 times. When taking the blood to the mark 0.5 and adding the Turk liquid to II, the blood is diluted 20 times.
In 1 mm3 of blood, the count of red blood cells in men (usually): 4 500 000-5 000 000, in women: 4 000 000-4 500 000
Work 1 Estimation of white blood cells in human blood
The purpose of the lesson: determine white blood cells count in the subject, compare the obtained data with the norm
The following is necessary for work: microscope, Goryaev's counting chamber with a cover glass, leukocytic mixer, disposable needle, watch glass, Turk liquid, cotton wool, alcohol, ether.
Work progress: The liquid Turk is poured into the watch glass. After pricking the vessel, the first drop is erased, and starting with the second drop take the blood into the leukocytic mixer to the mark of 0.5. Then, from the watch glass, add the Turk liquid up to the mark II (diluting 20 times). The blood-count pipette is closed at both ends with fingers and the blood mixture is thoroughly mixed. Prepare a counting chamber; rub polished glass above the middle ground to the side elevations of the camera's slide. After releasing the first 2 drops on a cotton tampon, the chamber is charged with the third drop.
Counting of white blood cells is carried out on the whole area of the chamber in 100 large squares, grouped in 4 and undivided into small squares, using Yegorov's rule (6). Since each large square is divided into 16 small ones, the counted number of white blood cells is placed in 1600 small squares. To calculate the number of white blood cells in 1 cubic mm of blood, use the following formula:
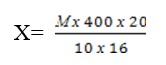
Х – the number of white blood cells in 1 mm3 of blood.
М – total number of white blood cells counted in the chamber.
20 – dilution rate.
100х16 – Recalculation of the area of large squares into small ones. Based on the calculation done, calculate the number of white blood cells in 1 mm3.
Control questions
- White blood cells, their structure and function?
- White blood cells count, their number in different animals?
- Leukocytosis and its types?
- What is phagocytosis?
- The influence of the nervous system other factors on the number of white blood cells?
- What is the Goryaev's chamber and mixer (blood-count pipette) for white blood cells?
6.3 Hemoglobin estimation
Hemoglobin is a carrier of oxygen, its amount in the blood varies depending on various causes; in particular it decreases with certain diseases, for example, with anemia.
Work 1 Hemoglobin estimation
The purpose of the lesson: get acquainted with the method of hemoglobin content estimation, the method of Teichmann crystals acquisition and the method of calculating the color index.
The following is necessary for work: Sahli hemoglobinometer, 1% HCl solution, distilled water, alcohol, ether, iodine tincture, cotton wool. The subject of the study is the blood of the lesson participants.
Work progress: A 0.1% solution of hydrochloric acid is poured into the graduated test tube of the hemometer up to the lower collar label 12.
The experimental animal's vein is punctured or the tip of the ear is incised. Take 20 mm3 of blood with a pipette attached to the device, wipe the tip of the pipette with cotton, and blow the blood to the bottom of the pipette so that the top layer of hydrochloric acid remains unpainted. Without taking out the pipette, rinse it with hydrochloric acid. Mix the contents of the tube, striking the bottom with a finger and leave it for 3-5 minutes. To complete hemolysis of red blood cells (Figure 6.2).
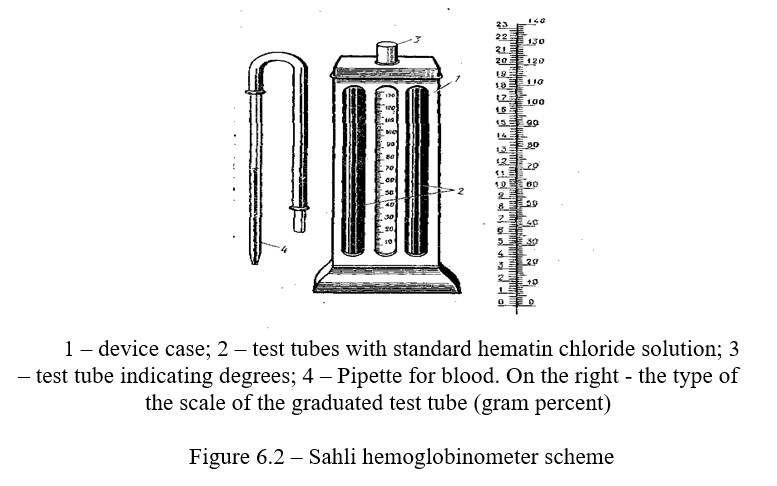
Hemoglobin, when reacting with hydrochloric acid, forms a hydrochloric acid hemin, causing a brown color. After 5 minutes, distilled water (in drops) is added to the tube, while constantly stirred, until the color of the solution coincides with the standard one. Now the percentage of hemin, and consequently hemoglobin, will be the same both in the standard solution and in the studied blood. The figure standing at the level of the obtained liquid shows the relative content of hemoglobin of the studied blood in % or Sahli units.
Knowing that the standard solution considered as 100% contains 16.67% of hemoglobin, it is possible to calculate the absolute hemoglobin content in the studied blood.

Suppose, according to Sahli, 70% of hemoglobin is found in the blood, we make the equation 100-16.67 meaning absolute content. When the hemometer has two scales at the same time, it is possible to determine the absolute hemoglobin content.
Control questions
- Hemoglobin, its structure and functions?
- The essence of the hemoglobin estimation method?
- 3. What is the color index of blood, how and why is it calculated?
- What principle is the estimation of the hemoglobin content based on and what units are used to express the received results?
- Due to what chemical element does hemoglobin carry oxygen?
- Using which sample it is possible to determine the presence of blood?
6.4 Erythrocyte sedimentation rate - ESR (according to Panchenkov) and the definition of osmotic resistance (ESR)
If the blood is prevented from clotting, when standing, it gradually divides into two layers: in the lower layer there will be red blood cells, and in the upper layer - plasma. The rate of erythrocyte sedimentation depends both on the erythrocytes themselves, on their quantity, shape, and on the physical and chemical composition of the plasma, more precisely, on the ratio of plasma proteins-albumins and globulins and the content of salts.
In men, the ESR is normally 3-6 mm per hour, and in women it is up to 15 mm per hour (in pregnant women, up to 45 mm). Acceleration of ESR has an important diagnostic value.
The purpose of the lesson: master the method for determining the ESR accoring to Panchenkov and observe the sedimentation rate of erythrocytes and show the osmotic resistance of erythrocytes to hypotonic solutions in 5 solutions of sodium chloride of various concentrations.
The following is necessary for work: disposable needle, % sodium citrate solution, Panchenkov's device, watch glass, water, alcohol, ether, cotton wool, clock.
Work 1 Erythrocyte sedimentation rate (ESR)
The erythrocyte sedimentation rate is more conveniently determined by
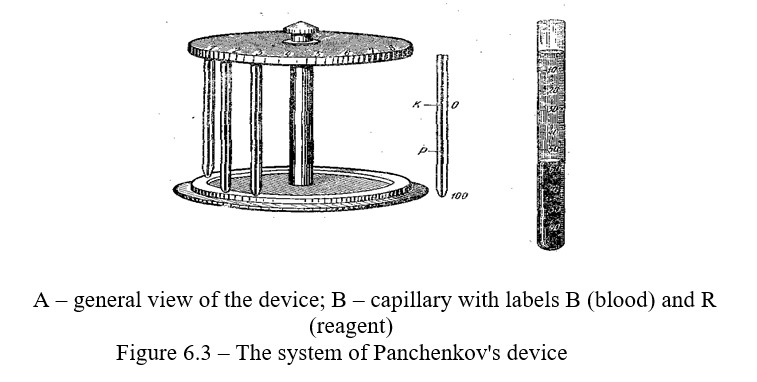
Panchenkov's micromethod. Panchenkov's device consists of a tripod of a set of capillary pipettes; the pipettes have 100 divisions. In the middle of the pipette there is a label 50 and R, and in the upper part at the level 0 there is a label B (Figure 6.3).
Work progress: Before work, rinse the pipette with citrate, dial citrate up to the label R and pour it into the watch glass. Then, using the same pipette, take experimental animal's blood twice up to the label B from the watch glass and put it in a tripod. Check the results of erythrocyte sedimentation along the column of the formed plasma above the erythrocytes in 15, 30, 45, 60 minutes. Determine the erythrocyte sedimentation in millimeters per hour using the height of the unpainted column.
Work 2. Hemolysis under the influence of various substances
The process of destruction of erythrocytes and the release of hemoglobin into plasma is called geolysis. Hemolysis can be caused by diverse agents that destroy erythrocytes. Erythrocytes retain their normal form, volume and function if they are in isotonic solution. An isotonic solution is a solution which osmotic pressure is equal to the osmotic pressure of the plasma. This solution is called a physiological solution (0.9% sodium chloride solution). If you place the red blood cells in the hypertonic solution, they shrink and decrease in volume. Conversely, in a hypotonic solution, the erythrocytes swell, increase in volume, and finally, are destroyed (hemolysis).
The osmotic resistance of erythrocytes is determined by the concentration of the solution, at which hemolysis does not yet occur. Erythrocytes have some resistance to hypotonic solutions. To measure the osmotic stability, the erythrocytes are placed in a solution of sodium chloride of various concentrations and it is observed in which solutions a partial or complete hemolysis occurres.
Work progress: For determination, take a solution of sodium chloride in a decreasing concentration: 0.9; 0.8; 0.7; 0.6; 0.5, 0.4; 0.3%. 5 ml of sodium chloride is added to each tube, with the concentration indicated above. Add blood by 1 ml.
Shake the contents of the tube and allow to stand at room temperature for 15 minutes. The maximum and minimum resistance of erythrocytes is determined by the degree of solution transparency. Usually erythrocytes can withstand a decrease in the concentration of sodium chloride in the solution to 0.44-0.48% without breaking down. In a 0.34% solution of sodium chloride, maximum destruction is observed.
Control questions
- What is ESR norm?
- How is ESR determined?
- What determines the erythrocyte sedimentation rate?
- What is hemolysis?
- What are the types of hemolysis?
- What is the osmotic resistance of red blood cells?
- How is the maximum and minimum resistance of red blood cells determined?
- The clinical significance of ESR?
6.5 Determination of the rate of blood coagulation
Blood coagulation is an extremely complex biochemical process, the final link of which is the conversion of fibrinogen into fibrin. The formed fibrin clot closes the injury site and thereby protects the body from blood loss. With increasing temperature, blood coagulation occurs faster. When the temperature goes down, it is slower. The process of blood coagulation can be prevented by adding substances that violate this or that phase of clotting. These substances include calcium salts, heparin, oxalic acid and citric acid sodium.
The purpose of the lesson: get acquainted with the methods of determining blood coagulation and establish the factors that affect the process of blood coagulation.
The following is necessary for work: Disposable needle, slide glass, watch glass, cotton wool, alcohol, ether, sand scales, cold water (0-5 0С) and warm (37-40 0С), water bath.
Work 1. Determination of blood coagulation time using Burker's method
Work progress: A watch glass is placed in a water bath with a water temperature of 25-30 °C; a small drop of blood and distilled water are pipetted onto the watch glass (water is boiled to remove CO2). Puncture the vein, put the drop of blood on the glass and mix it with water using a glass hook. Close the glass with the second watch glass, which has a moist filter paper on the inside, to create certain moisture in the chamber. Note the time and every 30 seconds go through blood with a hook, making spiral movements until the filaments of fibrin appear on the hook. Mark the time from the moment of taking the blood to the appearance of filaments of fibrin. Normally, it takes 5-8 minutes for a human. There is an even simpler method for determining the time of blood coagulation. Take 2 drops of blood and place them on a degreased glass slide. Every 30 seconds or 1 minute, tilt the glass with blood and repeat this until the blood coagulates and rolls down the glass as a greasy drop. The time from the application of blood on the glass to its coagulation will determine the rate of blood coagulation.
Work 2. Determination of blood coagulation time on a smooth and rough surfaces
Apply a drop of blood on a dry glass slide and a glass covered with paraffin, and record the time. Check the condition of the blood drop every 30 seconds. The coagulation time is determined by the appearance of a blood clot, i.e. the time between applying a drop on the glass and appearance of a fibrin clot.
Work 3. Some ways to accelerate, slow down and prevent blood coagulation
Experiment 1. Take 2 test tubes. Pour the citrate solution (1 ml) in one tube and pour calcium solution (1 ml) into another one, then pour 1 ml of blood into both tubes and shake gently. Observe the coagulation time in both test tubes.
Experiment 2. Take 3 test tubes, pour 1 ml of blood into each of them. Place one test tube in a glass with cold water, place another one in a glass with warm water and a third - with a hot one. Mark the time and observe when coagulation in each tube occurs.
After conducting all the variants of the experiment, summarize them. Blood coagulation time. Minutes:
- In a humid chamber.
- On a dry slide.
- On paraffined slide.
- In a tube with citrate.
- In a test tube with calcium.
- In a test tube placed in ice.
- In a test tube placed in warm water.
- In a test tube placed in hot water.
Control questions
- Biological significance of blood coagulation?
- Components involved in blood coagulation?
- Blood platelets or thrombocytes and their role in blood coagulation?
- Mechanism of blood coagulation?
- Why blood does not coagulate in the blood vessels?
- The importance of vitamin K in blood coagulation?
- Substances and methods that accelerate coagulation?
- The idea of an anti-coagulant system of blood?
6.6 Human blood group test
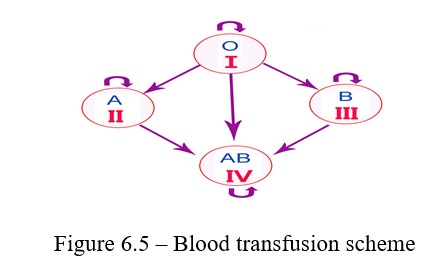
Human blood is attributed to a particular group, depending on the presence of specific substances in the erythrocytes and plasma. These substances in erythrocytes are called agglutinogens and labeled with letters A and B, and in plasma they are called agglutinogens labeled with Greek letters a and b. Agglutinins have the property of causing agglutination, i.e. gluing of erythrocytes in the presence of appropriate agglutinogens in them. Agglutinin a causes adhesion of erythrocytes containing agglutinogen A. Agglutinin b causes adhesion of erythrocytes containing agglutinogen B. Therefore, human blood can not simultaneously contain agglutinogen A and agglutinin a or agglutinogen B and aggutinin b.
When blood is transfused from one person to another, the gluing of the donor's red blood cells may occur. The reaction of gluing together of the red blood cells of one blood with serum of another is called agglutination. There are two types of agglutinins - alpha and beta, in blood plasma, and two types of agglutinogens - A and B, in red blood cells. Agglutination occurs when the blood contains the same agglutinogens and agglutinins (A with alpha, B with betta). Depending on the presence of certain agglutinogens in blood, the blood is divided into 4 groups. The table shows the content of agglutinogens horizontally and agglutinins vertically in I, II, III, IV blood groups (Table 6.1).
Table 6.1 – The ratio between isoantigens in erythrocytes and group antibodies in plasma in blood groups according to the AB0 system and the prevalence of these groups among the population
|
Blood group |
Isoantigens in erythrocytes |
Group antibodies in plasma |
Prevalence of blood groups among the population in % |
|
0ab(I) |
Absent |
a, b |
33,5 |
|
Аb(II) |
А |
b |
37,8 |
|
Вa(II) |
В |
a |
20,5 |
|
АВ0(IV) |
А и В |
Absent |
8,1 |
The purpose of the lesson: get acquainted with methods of determining blood groups.
The following is necessary for work: disposable needle, microscope, slide, glass sticks - two pieces, sera I, III blood groups, alcohol, ether, cotton wool
Work 1. Blood group test
Work progress: Drops of a standard serum of groups I and III are applied on a degreased glass slide. The blood is obtained from the subject with a usual. Serum of group III is gently mixed with a glass rod, while slighly jiggling the glass. A small drop of blood is transferred to a drop of serum of group II; the blood is gently mixed with serum and after 1-5 minutes the blood group is determined according to the results of the agglutination test. If there is agglutination, the drop becomes transparent, and the red blood cells are stuck together in lumps (Figures 6.4; 6.5).
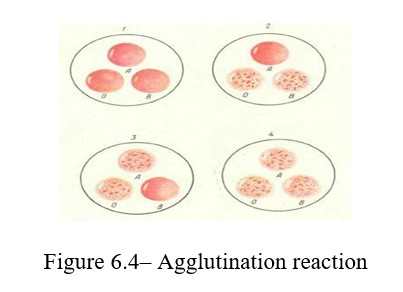
The blood group is determined depending on the nature of agglutination. If there is no agglutination reaction, this blood is the first group; when agglutination occurres with the serum of group III, the blood belongs to group II.
Agglutination with group II indicates belonging to group III. And finally, if agglutination occurres with the sera of groups II and III, the blood belongs to group IV.
Control questions
1. To which group does the studied blood belong?
2. What is the composition of agglutinins and agglutinogens in the studied blood?
3. What recipients can the blood of this group be transfused to?
4. Blood of which donor can be transfused to you?
5. What principle is used for blood type determining method?